Loading variables from a file to a bash script

Elegant

I’m just copying the idea from this answer in StackExchange because it looks to me as an elegant way to solve this question.

I have a file like this:
# Kernel
loggerlevel=0
fromlogfile=1
variables=100
period=60

Filled with variables and their values.

Next the script to process and use those variables:

#!/bin/bash

source kernel

echo $loggerlevel
echo $fromlogfile
echo $variables
echo $period

After sourcing it, we get :

. process.sh 

0
1
100
60

Easy, peasy!

Podman on Windows – Not pulling images

After looking for a replacement for docker I found this really comfortable substitute. 

It’s a clone of docker and even you can use the same Dockerfile and docker-compose files to make it run and manage it.

Until now I was working on Linux but then I realized that it also works on Windows and it has a Podman Desktop making our life easier in Windows world.  No obscure licenses.  The perfect replacement.

One problem though, in my work environment we are behind a VPN and when trying to pull images I was getting errors like this one:

Error: initializing source docker://ubuntu:latest: pinging container registry registry-1.docker.io: Get "https://registry-1.docker.io/v2/": dial tcp: lookup registry-1.docker.io: Temporary failure in name resolution

That’s not good.

Looking at podman desktop documentation we can see a reference to this same issue when the host is behind a VPN.

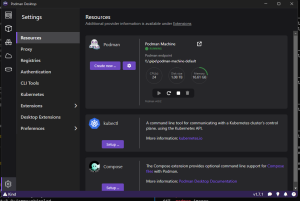
To solve this issue I just followed the instructions there.  But first I deleted the already existing Podman machine and created a new Podman Machine.

Create New Podman Machine


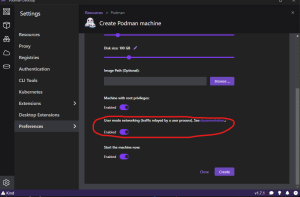
Next create a Podman machine but first enable “User mode networking”.

EnableUserModeNetworking

Enjoy your new container tool!

How to allow traffic from a hostname with dynamic address

This is a reminder on how to allow traffic from a windows machine to my Linux machine when that windows machine has a dynamic IP that changes once a day at least.  I want to have this answer at hand when needed.

I got this solution from this stackexchange answer.

Here you have:

sudo iptables -A INPUT -p tcp --src MyComputer-a1H75wMROeh.companydomain.com -j ACCEPT

If you want to allow access from the same machine but using a specific port, like ssh:

sudo iptables -A INPUT -p tcp --src MyComputer-a1H75wMROeh.companydomain.com --dport 22  -j ACCEPT


And that’s all for now!

Windows 11. How to change pinned and recent items for Remote Desktop in your taskbar

To increase or decrease the number of items that show in recent or pinned for Remote Desktop we have to use regedit.

If you want to do it for all the users go:

HKEY_LOCAL_MACHINE\SOFTWARE\Microsoft\Windows\CurrentVersion\Explorer\Advanced

and edit or add the DWORD value if it doesn’t exist

JumpListItems_Maximum

Set the convenient value for you, like 10 or 20 in decimal.

Close regedit and it should be it.  Otherwise restart windows explorer  or sign out and sign it.


Updating credentials to connect to a windows shared folder

We were unable to access to a sub-folder in a windows shared folder from one of the windows machines that are in different domains.

We still we can access to the windows shared folder but not navigating to the different folders in there.

The solution to this issue was to delete or cancel all the connections to that shared resource using command line in a windows command prompt:

net use \\remote-server\remote-folder /DEL

And repeat the same command for the other connections in that same resource.  You can find them running net use

When done with this task open the connection using the new credentials:

net use \\remote-server\remote-folder [PASSWORD] /USER:[DOMAIN\USERNAME]

And that should be it!


Good luck!

vsts agent offline on Ubuntu Server 22.04 LTS

In our in-premises Azure Devops pipelines we are adding a new agent with Ubuntu Server 22.04.

This agent was an Ubuntu Server 20.04 and was running without hiccups but new requirements came and we had to upgrade to the newer version of Ubuntu 22.04 LTS.

After upgraded, the agent went offline so let’s start the research online.

We found this discusion in github (https://github.com/microsoft/azure-pipelines-agent/issues/3834) and from there we applied the proposal workaround, at least until we upgrade the agent to a newer version supporting OpenSSL 3.0.  You can find more details in the link above.


wget http://security.ubuntu.com/ubuntu/pool/main/o/openssl/libssl1.1_1.1.1f-1ubuntu2.17_amd64.deb && dpkg -i libssl1.1_1.1.1f-1ubuntu2.17_amd64.deb && rm libssl1.1_1.1.1f-1ubuntu2.17_amd64.deb

sed -i 's/openssl_conf = openssl_init/#openssl_conf = openssl_init/g' /etc/ssl/openssl.cnf

If you compare this commands with the one described there you will notice that I changed the version …16.. to …17… to make it works.

Also, it’s important to update ‘openssl.cnf’ otherwise we will get authentication errors when building.


Happy Building!


String concatenation doesn’t work in bash

CRLF vs LF (again)

This time I was pulling my hair for a weird behavior in bash when concatenating strings in a bash script.

#!/bin/bash

# Read the version numbers from the file
variable1=$(grep VERSION_MAJOR file.txt | cut -d' ' -f 2)
variable2=$(grep VERSION_MINOR file.txt | cut -d' ' -f 2)
result="${variable1}.${variable2}"

echo "${result}"

The intention of this script is to echo two concatenated strings coming from storing a command in those variables.  But echo was showing only the value or ‘variable2’.

After a couple of hours blaming bash version, OS version, and searching online I found this question/answer in stackoverflow blaming ‘carriage return’.

And then again, I remembered that this file I was trying to parse was coming from a windows environment. 

I checked with 

cat -A file.txt

and indeed it was containing the windows carriage return. 

So I removed the CRLF characters using the tool ‘dos2unix’ and after running the bash script it shows now the expected result.

Windows 11. Opening Explorer.exe as administrator

For this hack I used the tool AdvancedRun offered by NirSoft  and combining the explanation given about “Run explorer.exe as Administrator user within Windows 7” and “How to run Command Prompt as Trusted Installer on Windows 11

Using the tool AdvancedRun I opened a command prompt as Trusted Installer.  Once there and from there

  1. I opened “Registry Setting” with regedit.exe
  2. Navigate to the registry key:  HKEY_CLASSES_ROOT\AppID{CDCBCFCA-3CDC-436f-A4E2-0E02075250C2}
  3. Right click on the registry key and click Permissions…
  4. Give Full Control permissions to the user logged in.
  5. Close “Registry Settings” and …
  6. From command prompt again now, open dcomcnfg.exe
  7. Expand DCOM Config
  8. Right click and select properties of “Elevated-Unelevated Explorer Factory“, click the Identity tab and select “The launching user“.
  9. Close dcomcnfg.exe and close also the command prompt we’re using

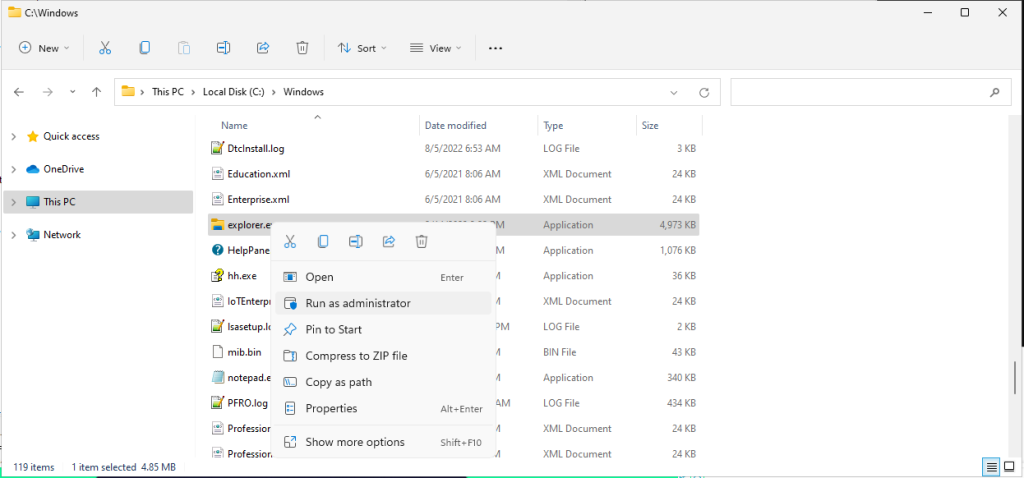
After this, you can for example open a new command prompt as administrator and execute “explorer.exe” or go to a current “File Explorer” C:\Windows and “Run as Administrator”

Opening explorer as admin from "File Explorer"
Explorer as Admin

Enjoy your new power!

Intellisense not working with Linux projects

I was having an annoying problem with intellisense in my Linux project.

Even though the project was building all completely and successfully, the error window was showing a bunch of errors saying “…cannot open source file…”.

Also if I wanted to open the file from the standard C++ library, e.g. <string> it wouldn’t open either.

I looked for an answer online using several search engines and even tried other tools like GPTChat to not avail.

I realized that I could open some other files though and they were located in a cache folder.  Browse up this folder and noticed that there were the files the Visual Studio couldn’t find.

Maybe Visual Studio (Intellisense) were not able to locate those files.  So, what if I backup the cache folder and then make Visual Studio through CMake to regenerate it.

That was it!

I closed Visual Studio.

Then renamed the folder “C:\Users\leon\AppData\Local\Microsoft\Linux” to “C:\Users\leon\AppData\Local\Microsoft\Linux.bak”.

Reopen Visual Studio and CMake started recreating the cache.

And voila!

The Intellisense errors disappeared and I can now open the file from the C++ standard library using for example the shortcut F12.